Using FIDO2/SK Keys with ZOC Terminal on Windows for Access to Linux Servers
This is a beginner-friendly tutorial. The article shows how to generate FIDO2/Yubikey keys to login to a Linux account with SSH public/private key authentication.Table of Contents
- Introduction
- Prerequisites
- Creating an OpenSSH SK/FIDO2 Key using ZOC
- Prepare the Linux Account to Accept the Key as Authentication
- Logging Into Your Linux Server Using Public/Private Key
- We Did It, Yay!
- Why ZOC Terminal is a Better Alternative for these Tasks Compared to PuTTY
Introduction
Since OpenSSH version 8.3 SSH servers support public/private key logins based on FIDO2 hardware keys like Yubikey 5-NFC or Yubikey BIO (Fido).
This article will show how to use ZOC Terminal to create a FIDO2 key pair and how to set up a new or existing Linux shell account to use these for login.
Setting up a Linux server will always require some work on the Linux shell. This article will explain basic tasks with ZOC Terminal. If you don't have ZOC Terminal installed already, you can download it here. There will be a free trial with all features enabled, no ads for 30 days of actual use (i.e. if you use the program only once a week, the trial will last you for half a year).
Prerequisites
- ZOC Terminal v9.0 or higher
- a FIDO2 compatible hardware token (e.g. a Yubikey 5 NFC)
If you have not done this already, you need to initialize the Yubikey for use with the FIDO2 protocol (in most cases it will require you to configure a PIN that protects the key):
- Download either Yubikey-Authenticator and install it.
- Start the Yubikey-Authenticator or Yubikey-Manager (under Windows you need to start it via right-click→As Administrator).
- Depending on the type of key select Applications→FIDO and set a PIN (or even a fingerprint).
Creating an OpenSSH SK/FIDO2 Key using ZOC
You can use ZOC Terminal to create an SSH-key that is linked to the Yubikey (or other FIDO2 token) and obtain the corresponding OpenSSH sk-file:
- Start ZOC Terminal
- Open the Tools-menu
- Choose Generate SSH Public/Private Key
- Select ECDSA-SK (FIDO2)
- Enter something in app field that identifies the intended use, e.g. the name of the server, e.g. ssh:zoc (the app needs to start with ssh: though).
- Optionally choose a passphrase
- Click Create public/private key files

This will create OpenSSH compatible key files in ZOC's SSH folder. The key will be a token-based non non-resident key (meaning it is based on the Yubikey but there will be no copy stored on the hardware). Also, the key will not require you to enter the token's PIN each time you use it, but it will require you to physically touch the device and you will need to enter the passphrase if you set one.
If you want more control over the options of the key creation, see our article about ssh-keygen.
Prepare the Linux Account to Accept the Key as Authentication
Copy the Public-Key to the Clipboard
- From ZOC Terminal's Tools-menu choose Copy SSH Public-Key to Clipboard
- Choose the id_ecdsa_sk.pub file (not the one without the .pub file type) and click Open
- Click Close on the message that shows the public key
Add the Public-Key to the Account
The next step depends on who creates your Linux account:
If you have a service provider who creates the account for you and who asked for your public key, simply send or email him the public key data that you copied to the clipboard.
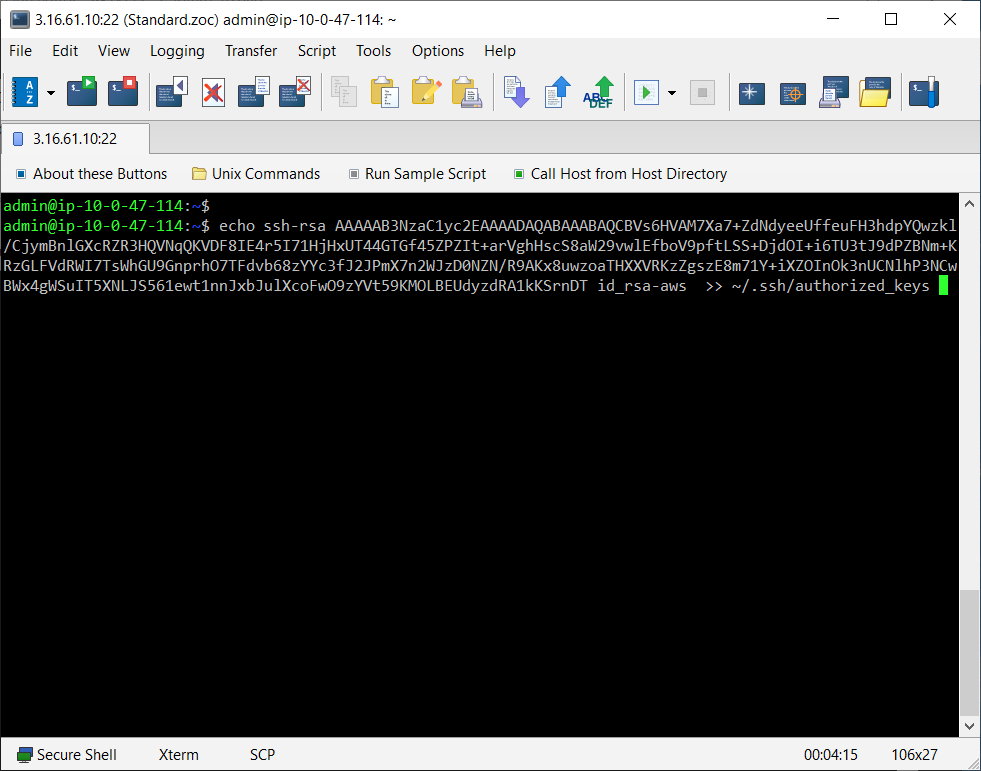
If you already have access to your Linux shell account via password authentication, login to the account and enter the following command:
echo xxxxxxxxxx >> ~/.ssh/authorized_keys
(instead of xxxxx, choose Edit-menu→Paste to paste the public key, which you put to the clipboard in the last step, into the command)
Logging Into Your Linux Server Using Public/Private Key
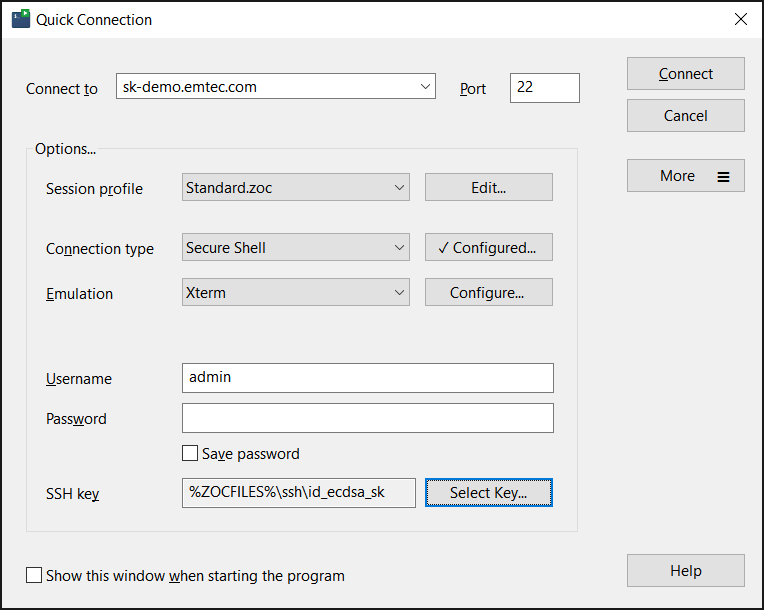
- Start ZOC and select File-menu → Quick-Connect (or use this window if it automatically opens after starting ZOC)
- Enter or select the following values:
- Connect-To: (paste your servers's name or ip address)
- Connection-Type: Secure Shell
- Emulation: xterm
- Username: (your username)
- click on Select Key... and Private Key and choose the
id_ecdsa_skfile (this time use the one without the .pub extension, i.e. not theid_ecdsa-sk.pubfile)
- Click Connect
We Did It, Yay!
If you created the private key using a passphrase, a window will pop up to ask you for that. Also, depending on the key, a window may also pop up or a message may appear on your screen, that will ask you to enter the PIN and physcially touch your key.
After a moment should see a connection screen that shows the connection proceeding and eventually you will see the familiar $-prompt.
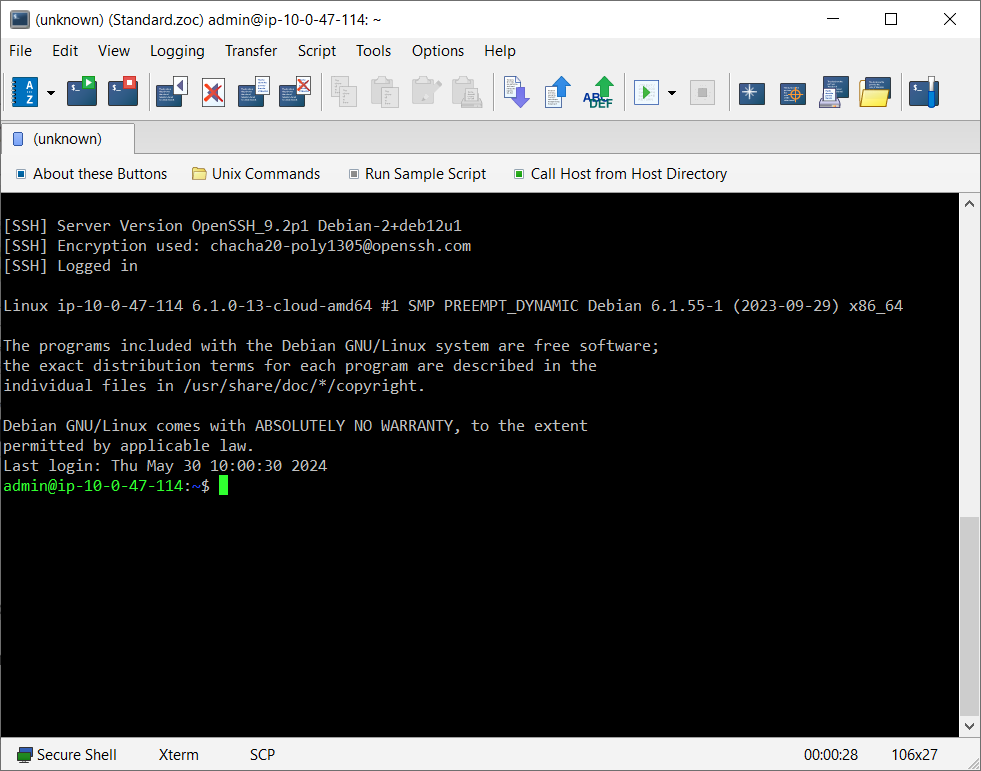
Now you are logged into the Linux using your public/private key pair.
Why ZOC Terminal is a Better Alternative for these Tasks Compared to PuTTY
You can perform the above tasks with a free SSH client like PuTTY as well.
However, while PuTTY is a reasonable choice for to access Linux shells every now and then, ZOC Terminal is designed for ease of use and effectiveness day in and day out. It offers elegant features that save you a lot time when performing routine tasks.
For example, as you saw, creating the key-pair and obtaining the public key takes only a matter of seconds (about 10 mouse clicks).
Connecting to your Linux system through the Quick Connect window is also very easy. If you log off and then realize you forgot something and want to connect again, you can simply press Alt+R in the disconnected tab. Alternatively, go to the Quick Connection window again and click Connect, so you are reconnected with just two mouse clicks.
For file uploads, you can upload files to your server merely by dragging them from the desktop into the ZOC terminal area.
If you are building multiple instances, you can save them from the Quick Connection window to the Host Directory. From there, you can even connect to multiple instances at once (each will then open in a separate tab).
Assume you need to update or install a package on five servers: Open the Host Directory,
select the servers using shift+Mouseclick and click Connect. Then press Alt+C to open
the Local Typing window. Type your command (e.g., sudo apt update && sudo apt install -y build-essential ),
click Send to all tabs, press Enter and you have easily performed this task in under a minute.
Press Shift+Esc to watch the parallel output in the Thumbnails overview. Below is a 60-second
video which shows how it works and which also shows a few other functions because after
updating 5 servers. Within those 60 seconds there was even time left to show file uploads
and tab colors ;-).
These are just a few examples that demonstrate how using a professional ssh client like ZOC can save valuable time compared to free tools like PuTTY (which admittedly does cover the essentials quite well).
Conclusion: Using ZOC Terminal to performe routine terminal tasks with ease saves time and it also is more fun!